Wednesday 16 November 2011

More vintage inspiration found at The Makery.


All things vintage.

Feeling a slight Christmas overdose already, The Makery have mixed things up a bit and given us a more long term project to get our teeth into. Being given a broad selection of ideas and our own ideas being welcomed I've been churning ideas round my head for days.

They're looking for new packaging designs for their creative kits, possible designs for their own rubber stamps and unique to The Makery ribbon and fabric label designs. In keeping with their haberdashery style, I started with looking at old sewing cards, books and styles.

I think the vintage look will suit the shop. The graphics used in these pieces gives a nostalgic homey feel and it's more personal then the mass produced packaging we see these days...


All lit up.

The jars look even better lit up. Small artificial tea light candles do a pretty good job of looking like a real tea lights, they even flicker.


Wednesday 2 November 2011

Starting to feel the christmas love.

Here's a few of my first attempts at creating the small heart cushions and playing around with colour and pattern combinations. They still need stuffing and a few final tweaks.


Christmas window.

Following last weeks discussion for ideas of how we can bring Christmas to this years window at The Makery.We had the idea of creating something we can hang multiples of in the window to create a dramatic and eye catching statement. After the success of the previous cotton reel window display, we looked at the Christmas fabric and colours and came up with the idea of creating small heart shaped cushions and ways in which we could hang them.

Finally we decided upon hanging around 40 of these hearts, in 4 different sizes at different depths and heights.

 Now it was time to rummage threw the beautiful hand picked fabrics and ribbons they have at The Makery and get busy sewing!
Initial designs using the natural hessian fabric and the red and green colour scheme for the fabrics and ribbons.

Quick sketch of The Makery window, with an idea what the hanging hearts will look like.

Thursday 27 October 2011

Shop window.


The days are getting colder, the evenings are becoming darker and the street Christmas lights are already up. This only means one thing, Christmas is well and truly on it's way.

We have our doily jar designs and ideas for decorating the studio space in time for the Christmas market stalls ready and raring to go, so our next step is to get the main shop window looking Christmassy too! Last years window, shown above, was a great hit and had people stoping in their paths to take a look and photograph it. So this years will have to be equally as good, if not even better!

Thursday 20 October 2011

Book binding.

This internship keeps getting better and better. Finding out there was space on a book binding class, I decided to give it ago. With straight lines, accuracy and perfecting neat and tidy edges not being my strong points, I knew it would be challenge.
The demonstrations took a lot of concentration, but each step was well explained and was do able with a bit of perseverance.


The class enabled us to use all the correct equipment and the step by step demonstrations for each stage were helpful and informative. Making sure the paper was folded with the grain and at the right size, the next step was aligning the holes and piercing them through all the sheets, ready to sew the book together.

Sewing the pages together was a relatively easy stage of the book binding process, it only took some concentration and making sure everything was kept taut.

As well as using techniques, the class taught us new skills. Like the kettle stitch and the Japanese knot, that is shown in the image above, these are special book binding techniques to attach the pages at the right tension and positions.

A few one on one demonstrations were needed for the more fiddly bits, that we all struggled with. But soon the sewing was complete.

We had a wonderful range of fun bright colours, for the end papers, front and back covers, page selecting ribbon and end braiding, it was a tough decision which colours to choose!

Attaching all the components and pieces together took a lot of careful cutting, sticking and accuracy, but eventually the book was taking shape and the end result was looking hopeful.

As the class came to an end, we were all apprehensive to see how our books would turn out. Aligning and cutting the boards and fabric for the cover was one of the most difficult parts. I personally struggled to get my cuts straight and the right size  boards for my pages.

I chose this deep burgundy pink colour for my front and back cover. Nice contrast to the sunshine orange end pages inside and bright striped ribbon. Gluing the covers on was easier then expected and the odd air bubbles were relatively forgiving.


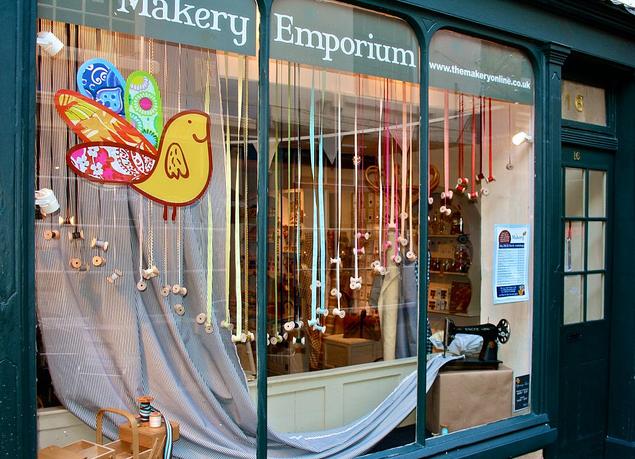
The end is near.We stacked our finished books up and put them under this old fashion Singer sewing machine as a heavy weight to compress the pages and help the books dry nice and flat.

I have kept my book under a heavy weight over night, as advised. So fingers it's all stuck nice and neatly by the morning!

Friday 14 October 2011

Squares and squares and squares of fabric.

We've also been giving a little helping hand creating little bundles of fabric. 18 fabric designs, all bundled up with a Makery leaflet, tied with string and finished off with a brown label.


They looked so good all laid out like sardines ready to be posted and awarded to the lucky new subscribers to a craft magazine.

Christmas jam jars.

Being inspired by the doily jam jars and the almost magical look they have when they are lit up, we had a little creative session and came up with this idea. Quite a simple way of adding some festive cheer and once a little tea light is burning inside it should create a cosy atmosphere too!


Using jam jars we've collected, allows us to gather equipment easily and the decorative extras will be supplied from The Makery's emporium. Hanging these from the beams and in the windowsills will hopefully create some festive cheer to our Christmas market stalls.

Thursday 13 October 2011

Starting to get festive.

Discussing the need to add a touch of Christmas to the upstairs of the The Makery Emporium, ready for the Bath Christmas market, we all joined together and discussed our ideas, sticking with the natural shades that already appear on The Makery's Christmas advertisements.

One of the ideas I found, proved popular and followed Kate's love for white doily's and natural colour scheme. These lit up jam jars seemed to be an all round winner with everyone and we starting planning how we could give them a sophisticated Makery twist. Now all we need to do is spread the word around friends and family for our need for empty jam jars, of all shapes and sizes!


Visit Amanda's lovely blog to find out more... http://greenowlcrafts.blogspot.com/2011/01/daintyromanticrustic.html

The Makery.

There are too many words to describe how beautiful and luscious all the crafty bits and bobs are inside The Makery emporium.


Their workshops and classes share some of their creative juices and their shop is one of the few creative treasures that lies within Bath. I am honoured to be starting my internship with them!

First day.

When I received an email with information about an internship at The makery, I was apprehensive as to whether I would be the kind of person they would be looking for, but I thought it was an opportunity I couldn't miss out on. After choosing the right outfit, carefully selecting a few pieces of work to show, as requested, I walked into the interview dubious of my chances but confident I would make a positive impression.
Opening an email headed with the word 'congratualations' I found out I had impressed them in my interview and I got the internship. This will be an exciting new journey.